Where Websites Come To Life
Importing Applications
Posted: May 14th, 2018
When a website importing is initiated, Plesk scans the source website for the presence of certain applications and lists them. Currently, you can import the following applications to the target server:
> WordPress
> Joomla
> Drupal
> PrestaShop
Plesk can import an application from the source website to the target, including all its files and the database.
Caution: When importing an application, if there is already an application installed on the target domain, its files may be overwritten. We strongly recommend backing up the target domain before importing applications.
When importing an application, keep in mind the following limitations:
> The application must use a MySQL database.
> The MySQL database server must use the default port.
There may also be additional requirements specific to the application you want to import. You can find them in the application's documentation:
> WordPress
> Joomla
> Drupal
> PrestaShop
Note: Plesk cannot automatically check if the application you want to import meets the requirements. Make sure that the application meets both general and application specific requirements before starting importing.
To import an application, follow these steps:
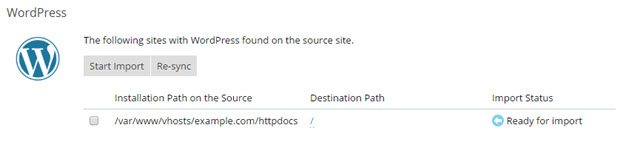
1) Select the checkbox(es) next to the application(s) you want to import.
2) By default, the application files are placed in the same location relative to the document root they occupied on the source. If desired, you can change where to place the application files on the target server. To do so, click the / link under “Destination Path” and type in the path to the destination folder (relative to the document root).
3) Click Start Import.
The installation's status will change from "Ready for import" to "Queued", and then to "In progress". Once the status changes to "Imported", application importing was finished.
Synchronizing Imported Applications
At any time after you have imported an application, you can import it again by selecting the corresponding checkbox and clicking the Re-sync button. Note that this will overwrite any changes you may have made to the installation on the destination server.