Where Websites Come To Life
Managing WordPress Instances
Posted: May 14th, 2018
Go to WordPress on the Server to see all your WordPress instances.
WordPress Toolkit groups information about each instance in blocks we call cards.
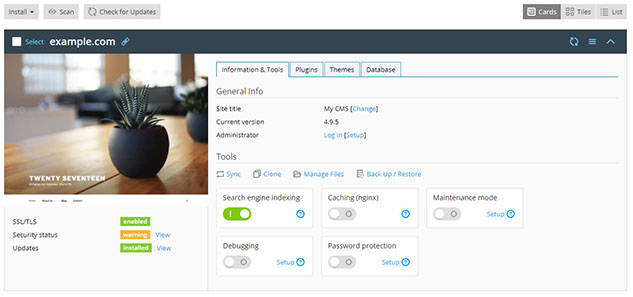
A card shows a screenshot of your website and features a number of controls that give you easy access to frequently used tools. The screenshot changes in real time to reflect the changes you make to your website. For example, if you switch the maintenance mode on or change the WordPress theme, the screenshot of the website will change immediately.
Note: Changes you make directly in WordPress are synchronized with WordPress Toolkit once every 24 hours. To sync manually, click the refresh - Copy button.
When you move the mouse cursor over the screenshot of the website, the Open Site button appears. Click the button to open the website in a new browser tab.
Security
WordPress websites are frequently targeted by hackers. WordPress Toolkit analyzes how safe your instance is by checking the following security aspects and showing the result below the screenshot of the website:
> SSL/TLS support
> Enhanced security of your website
> Installing updates
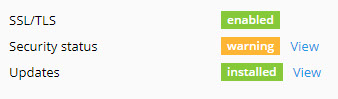
If you see “warning” or “danger” next to one of these aspects, click “View” and fix it.
General Information
In the “General Info” section, you see the WordPress website’s title and its WordPress version. Here you can:
> Click “Change” next to the default “My SMS” title to give your website a custom name.
> Click “Log in” to log in to WordPress as an administrator.
> Click “Setup” next to “Log in” to change general WordPress settings.
Tools
In the “Tools” section, click to access the following WordPress Toolkit features:
> “Sync” to synchronize the content of your website with another one.
> “Clone” to make a full copy of your website.
> “Manage Files” to manage the website’s files in File Manager.
> “Back Up/Restore” to create a backup of your website and restore it if necessary.
The controls below give you easy access to the following settings and tools:
> “Search engine indexing” shows your website in search results of search engines.
> "Caching (nginx)" speeds up the website load time and reduces server load.
> “Debugging” helps you debug a website that is not ready for viewing and being tested or developed.
> “Maintenance mode” hides your website’s content from visitors.
> "Password Protection" specifies the password you will use to log in to WordPress from Plesk.
On the remaining three tabs you can manage the instance’s plugins, themes, and change the database username and password.
Managing Cards View
You can choose the way WordPress Toolkit shows cards. The default “Cards” view is best suited for a small number of instances. If you have a large number of instances, collapse cards , or switch to the “Tiles” or “List” view.You can also Sort and Filter instances to manage them more easily.
Removing and Detaching Instances
You can detach WordPress instances that you do not want to see and manage in WordPress Toolkit. Detaching does not remove the instance, merely hides it from WordPress Toolkit. A detached instance will be attached to WordPress Toolkit again after you scan for WordPress instances. To detach a WordPress instance, go to WordPress, choose the instance you want to detach, click the detach - Copy button, and then click Detach.
Unlike detaching, removing completely deletes a WordPress instance. To remove a WordPress instance, go to WordPress, choose the instance you want to delete, click the detach - Copy button, and then click Remove.
Search Engine Indexing and Debugging
By default, a newly created WordPress Toolkit website is shown in search results of search engines. If your website is not yet ready for public viewing, switch off Search engine indexing.
If you are installing WordPress for testing or development, you can enable Debugging to automatically find and fix errors in the website code. To do so, click "Setup" next to “Debugging”, select the WordPress debugging tools you want to activate, and then click OK.
Updating WordPress Instances
To keep your website secure, you need to regularly update the WordPress core, as well as any installed plugins and themes. You can do this either automatically or manually:
> Manual updates give you control over when updates are installed. For example, you can wait and see if installing a particular update caused issues for other WordPress users. However, you need to remember to update regularly to avoid falling behind.
> Automatic updates give you peace of mind by keeping your WordPress instance up-to-date. However, updates can sometimes break your instance, and with automatic updates, you may not learn about it right away.
For security reasons, we recommend that you configure automatic updates.
To update a WordPress instance manually:
1) Go to WordPress. If your WordPress instance needs updating, you will see “available” next to “Updates” (below the website screenshot)
2) Click “View” next to “Updates”, wait for WordPress Toolkit to load the list of available updates, and then select the updates you want to install.
Note: If an update of a WordPress core is available, you will see the “Restore Point” checkbox. Keep this checkbox selected to create a restore point you can use to roll back the update if something goes wrong.
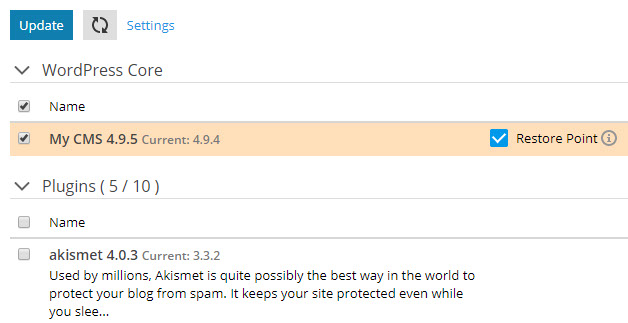
3) Click Update.
The selected updates will be applied.
To configure automatic updates for a WordPress instance:
1) Go to WordPress and choose the WordPress instance that you want to update automatically.
2) Click “View” next to “Updates”, and then click “Settings”.
3) Choose the desired automatic update settings. You can configure automatic updates separately for WordPress core, plugins, and themes (for example, you can choose to enable automatic updates for plugins and themes, but not for WordPress core). Follow these recommendations:
> Selecting “No” next to “Update WordPress automatically” turns off automatic updates of WordPress core. This is insecure.
> If your website is publicly available (production) and you are concerned that applying updates automatically may break it, select “Yes, but only minor (security) updates”.
> If your website is a non-public (staging) version of a WordPress website, select “Yes, all (minor and major) updates”. This will keep your staging website up-to-date and ensure that, should an update break something, it happens to the staging website and not to the production one.
4) Click OK.
If you are concerned that WordPress automatic updates may break your website, use Smart Updates. With Smart Updates, WordPress instances are always updated safely without breaking your website.