Where Websites Come To Life
Installing the R1Soft agent on a dedicated server (Windows)
Installing the R1Soft agent on your dedicated server with Windows OS can be done by an KEKhost/KEKhosting technical agent but if you'd like to do it yourself, you will need the IP of your dedicated backup server.
Note: The R1Soft v2 agent cannot run simultaneously with R1Soft v5 since both use port 1167. To uninstall R1Soft v2 go the the Windows Uninstall menu and locate the program and click 'Uninstall'.
Follow these instructions when you are ready to install R1Soft v5:
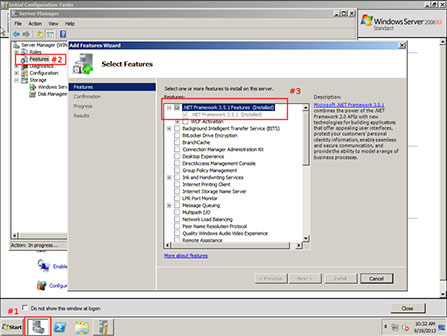
1) Open the Server Manager window.
2) In the left side menu,
a) Right-click 'Features' and select 'Add feature'.
3) Select .NET Framework 3.5.1. Features and click 'Install'.
a) Be sure NOT to select WCF Activation
4) Download the agent and unzip the archive
32 bits : http://repo.r1soft.com/trials/ServerBackup-Enterprise-Agent-win32.zip
64 bits : http://repo.r1soft.com/trials/ServerBackup-Enterprise-Agent-win64.zip
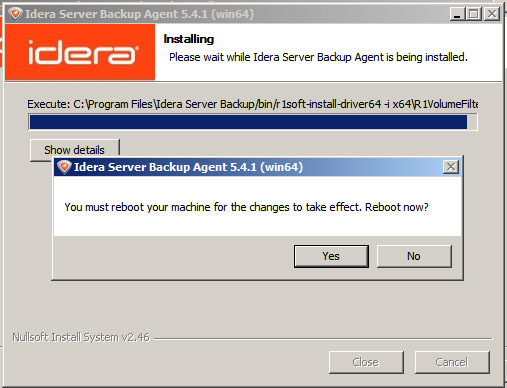
5) Launch the executable file.
6) Select your language and click 'Next'.
7) Read and accept the terms and click 'Next'.
8) Click 'Next' for the proceeding three screens and then click 'Yes' to reboot your machine.
9) To start the configuration, click on the Start menu.
10) Launch the program called 'Backup Agent Configuration Utility'.
11) Uncheck the 'agent debug mode', then click on 'Service' and restart the agent.
12) Select the 'Authorized Server Backup Managers' tab.
13) Click Add.
14) n the Add Server Key window, enter the IP or URL of your R1Soft dedicated backup server.
15) Click OK and close the window.
16) Go to the 'Services' menu and click 'restart'.
Read the following articles on confirming connectivity to R1Soft for your firewall:
For Smart Server firewalls: Troubleshooting Smart Server firewall connectivity to R1Soft